

When cleaning a room, many people instinctively begin by cleaning the floor. While it’s true that a lot of dust collects on the floor, a quick look up at the ceiling can persuade you to reconsider your intentions.
If not cleaned regularly, ceilings will attract lots of dust particles, including cobwebs and bug nests, which can make it seem nasty. It is therefore not enough to only dust your kitchen, but you should always have a schedule on how to regularly dust and clean your ceiling to ensure wholesome cleanliness of your kitchen.
Cleaning the ceiling on a regular basis is especially essential in the kitchen. The reason is that dust particles from the ceiling can fall into the dishes you’re cooking below. Fortunately, cleaning kitchen ceilings isn’t as hard as it might appear at first.
Focus on Cobwebs
When it comes to cleaning your kitchen ceiling, cobwebs are the biggest eyesore. Because of their transparent webs, some cobwebs might be difficult to spot.
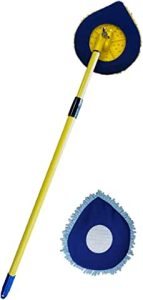
Ensure that you use a cobweb broom to sweep the roof. This tool will help get rid of even the toughest cobwebs. Check areas around light fixtures and power vents for cobwebs, as they are the most common spots.
No products found.
How to clean a kitchen ceiling in an easy way
Using a manual broom:
This is a great way to ensure that all tiny dust particles are cleaned from your kitchen ceiling. You can wrap an old cloth or T-shirt over the broom’s head as a warp. Brush the whole kitchen ceiling with the cloth-covered broom. Make a special effort to clean the corners of the ceiling, which are prone to dirt gathering.
Clean the ceiling with a vacuum:
The best approach to cleaning the kitchen roof is to vacuum. It will help to remove all the dirt, including bug nests and cobwebs. To soak in the dust, use the brush attachment at the end of the vacuum tube and the sucking feature. A stool or a step ladder is the best option if the vacuum cleaner cannot reach your kitchen ceiling.
Use a damp sweeper for oily kitchen ceilings:
- Use warm water and soap to clean the kitchen ceiling with oily dirt buildup.
- Run the broom along the ceiling in long strokes after dampening it in the cleaning solution. You can use a simple solution of warm water after every brush from the soap solution to clean the area.
- After you’ve finished damp washing the kitchen ceiling, let it air dry.
Getting Rid of Grease on a Kitchen Ceiling
What you will require:
- Dishwashing liquid
- Bucket
- Open tarps or trash bags
- Water
- Vinegar
- Stepladder (optional)
- Using a sponge, mop the floor.
No products found.
- To protect the floors from the inevitable dripping that comes with cleaning above your head, place garbage bags or a canvas under the area you’re cleaning.
- Fill a bucket with 1-quart of hot water and pour in 2 tablespoons of vinegar. Although vinegar is a natural grease remover, adding more to the water solution will ruin flat paint.
- Pour in a squirt of dishwashing soap (the one used for washing dishes by hand, not in the washer). Many dish soaps can get rid of grease from dishes. It gives your ceiling grease removing solution a boost of cleaning power while remaining delicate enough not to damage the paint.
- Soak a sponge mop in the cleaning solution. Remove any excess water by squeezing it out.
- Raise the mop above the greasy area and gently press it against the kitchen ceiling as you move it to and fro. Even with a long mop handle, you’ll need a ladder to reach the ceiling if it’s particularly high or arched.
- Regularly reload the cleaning solution and dip your mop into the bucket to get rid of grease from the mop. Every time, squeeze off the extra water.
- Work in small parts at a time, getting rid of as much grease as you can before moving on.
- After you’ve finished cleaning the ceiling, fill a bucket with hot, clean water.
- Rinse the mop in clean, hot water and squeeze off the surplus water.
- To eliminate any vinegar or soap residue from the clean kitchen ceiling, press the clean wet mop against it and move it to and fro. Repeat until your kitchen ceiling is just slightly wet and there is no soap residue.
Tips on grease removal from your ceiling:
- The last rinse and drying are crucial. The extra minute spent rinsing and drying the kitchen ceiling is what prevents dirt lines and streaks. You should not overlook the significance of drying.
- Don’t put the bucket in front of the ladder. This is a trip danger when you step off the ladder, aside from the mess if you knock the bucket over.
- Take frequent breaks. It’s exhausting to work with your hands over your head. When you hurry to “finish the chore,” your work becomes untidy, and your outcomes suffer. You’ll be happy later when you see a sparkling kitchen ceiling, even if you have to complete half the work today and finish the other half the following day.
Removing smoke residue from your kitchen ceiling
No products found.
Whether you’re a novice in the kitchen or a seasoned cook, you’re certain to burn a dinner at some point. Unluckily, the smoke residue will accumulate in your kitchen ceiling.
While this will make a big mess and leave some unpleasant blemishes, smoke residue will also ruin your kitchen’s drywall and paint. The following is a step-by-step instruction to clean smoke residue from your kitchen ceiling.
Step 1: Make sure the area is well ventilated
To begin with, open doors or windows to allow fresh air into the kitchen. To prevent excessive exposure to any powerful chemicals, you should have air circulation all over the area when dealing with cleaning supplies.
Step 2: Set up your workspace
Prepare the area to get a little dirty from the soot or smoke you’re removing from your kitchen ceiling as it crumbles and falls. It is best to use latex gloves to ensure your hands stay clean or a drop cloth to reduce cleaning when dealing with smoke residue.
Step 3: Take precautions
Protect yourself as well when clearing soot from the ceiling. If this is a do-it-yourself project, wear protective face gear, such as a mask or nose guard, to avoid breathing in dust and soot particles. To protect your lungs and breathing, the kitchen should be well-ventilated.
Step 4: Clean the kitchen ceiling with a vacuum
No products found.
You’ll need to get the vacuum out to start cleaning the smoke from the kitchen ceiling. Why? Because dust and other household debris might attach to your ceiling’s smoke and grease streaks.
Have you ever attempted to clean a dusty area like your bathroom counter? If so, you know how difficult it can be. Dry vacuuming the dirt away will save you time in the long run.
Step 5: Wipe away any remaining soot
After that, wipe away any dry soot that’s visible beneath the dust. You can either use a paper towel or purchase a cleaning cloth or a smoke-specific sponge.
Step 6: Using a grease cleaner, spray the area
After you have gotten rid of the majority of loose particles, it is best to use a degreaser to get real results. A mild degreaser dish soap might be enough for small areas. You might have to buy a stronger degreaser chemical for bigger soot-covered spots.
After using your preferred cleaning solution to spray the area, use a sponge or towel to wipe the smoke away. Depending on the extent of the damage, you might require many sponges and strokes.
Step 7: If necessary, repeat the process
It might be necessary to de-grease big, deeply discolored sections over time. Just repeat step six as many times as necessary.
Precautions to take before cleaning your kitchen ceiling
You can use a plastic sheet to cover the furniture. Temporarily remove lightweight furniture from the kitchen. This will let you move around freely while cleaning your kitchen ceiling.
To reach the kitchen ceiling, use a stool or step ladder if it is too high. It’s also a good idea to use a broom with a long handle. As you ride the stool or step ladder to reach the surface, ensure that someone is holding the stool or ladder.
When cleaning your kitchen ceiling, wear safety glasses. This is because dust can quickly fall into your eyes, which makes it hard to see very well. When using brooms and other clean-up equipment, always use rubber safety gloves to protect yourself from contamination.
To get the best results, you should follow some basic preventative procedures before undertaking any kitchen ceiling cleaning mission.
General Tips for cleaning the kitchen ceilings
This is one of those kitchen areas that you look at all the time but rarely clean.A lot of people overlook the fact that it fades oil and smoke stains, which are difficult to remove afterward. One of the factors making it difficult to keep ceilings clean is their height.
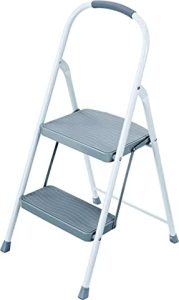
Fortunately, you can get around this by purchasing one of the best folding step ladders on the market. These ladders can support hefty loads and are available in a variety of sizes. They allow you to operate safely at various heights.
Vacuuming the Ceiling
No products found.
Are you aware that a vacuum cleaner can perform a perfect job of cleaning your kitchen ceiling? All you’ll require is a hose attachment. Make sure it reaches the ceiling and takes up dust, debris, or other matter with minimal damage.
One of the simplest techniques for cleaning a kitchen roof is to run a vacuum cleaner along the surface gently. With powerful suction, it will be able to suck up and clean up a lot of debris and dirt without any effort.
When cleaning, focus on the air vents, corners, and the points where crown moldings meet your kitchen ceiling. If the kitchen has twin window fans blowing fresh air in, remember to clean them too. Over time, these systems gather allergens and dirt.
Dusting the Ceiling
Spider webs, debris, and dust can accumulate on the corners or the entire kitchen ceiling over time. If you don’t look after them properly, they might compromise your property’s value and appearance. However, it isn’t as difficult as some believe.
Using a duster to wipe the kitchen ceiling will remove debris and bring it back to its original appearance. This is a good technique to get rid of dust and debris while also destroying spider dwellings, which can be a health threat based on the species.
Make use of a soft microfiber duster. These effectively take up debris and clean kitchen ceiling boards without damaging or scratching their grain.
In addition, you can recycle it multiple times without losing its functionality. When you’re cleaning, avoid putting lots of pressure on the surface. This will cause dust to stick to the surface.
No products found.
Here are tips to help you clean your ceiling like a pro:
Deep Cleaning
Moisture and cooking oils, which evaporate from the food we cook, can settle on the kitchen ceiling. This will cause grime to build up on the ceiling. They make the kitchen look ugly, and no amount of dusting will remove them.
Vacuum cleaners function, but only hardly, whereas using an eraser to clean such spots will take days. You’ll need “big guns” to get rid of hard-to-remove grime and stains. Vinegar is the most widely accessible and, without a doubt, the most effective grease stain remover.
Spray the affected region with some hot water drops. Using a dry cloth, wipe down the surface. You may also use the solution to moisten a towel and use it to deep clean the kitchen ceiling.
In addition, you can use Trisodium Phosphate and baking soda to clean your ceiling. They are safe to use and gentle on walls.
Using whichever method you like, use circular movements to rub the grime until the grease is gone. After that, use a damp cloth to wipe the area clean and let it dry before using it.
Erasing
What exactly is erasing? Over time, carbon-like marks might appear on your kitchen ceiling and refuse to go away despite wiping. Use a pencil eraser to rub them away gently to remove the marks.
Pen and crayon marks, prevalent in bedrooms and kitchens of families with kids, can easily be removed using an eraser. The key to making your work easier is by using a bigger eraser. To clean high spots, you’ll require a portable step ladder or a step stool.
Conclusion on Ceiling Cleaning
If you allow debris to build up on your kitchen ceiling, it might be hard to clean efficiently later. In such circumstances, the only choice is to repaint your kitchen ceiling. This can be both expensive and time-consuming.
By learning how to clean your ceiling the right way and with ease, you can avoid the extra expenses and inconvenience that come with the need to regularly paint your ceiling.
Thankfully, unlike the kitchen floor which quickly accumulates dirt and grime, the ceiling accumulates grime over time. As a result, rather than making the task more difficult later on, keep yourself active on weekends and maintain the kitchen looking new.